Built-in Objects
Pygame Turbo provides useful built-in objects to help you make games easily.
Screen
The screen object represents your game screen.
It is a thin wrapper around a Pygame surface that allows you to easily draw images to the screen (“blit” them).
- class Screen
- surface
The raw Pygame surface that represents the screen buffer. You can use this for advanced graphics operations.
- bounds()
Added in version 1.3.
Return a ZRect representing the bounds of the screen.
- clear()
Reset the screen to black.
- fill((red, green, blue)[, gcolor=(r, g, b)])
Fill the screen with a solid color.
Added in version 1.3: If
gcoloris given then fill with a gradient, fromcolorat the top of the screen togcolorat the bottom.
- blit(image, (left, top))
Draw the image to the screen at the given position.
blit()accepts either a Surface or a string as itsimageparameter. Ifimageis astrthen the named image will be loaded from theimages/directory.
- draw.line(start, end, (r, g, b), width=1)
Draw a line from start to end with a certain line width.
- draw.circle(pos, radius, (r, g, b), width=1)
Draw the outline of a circle with a certain line width.
- draw.filled_circle(pos, radius, (r, g, b))
Draw a filled circle.
- draw.rect(rect, (r, g, b), width=1)
Draw the outline of a rectangle with a certain line width.
Takes a Rect.
- draw.filled_rect(rect, (r, g, b))
Draw a filled rectangle.
- draw.text(text, [pos, ]**kwargs)
Draw text.
There’s an extremely rich API for positioning and formatting text; see Text Formatting for full details.
- draw.textbox(text, rect, **kwargs)
Draw text, sized to fill the given Rect.
There’s an extremely rich API for formatting text; see Text Formatting for full details.
Tip
All of the colours can be specified as (r, g, b) tuples, or by
name, using one of Pygame’s colour names
Rect
The Pygame Rect class is available as a built in. This can be used in a variety of ways, from detecting clicks within a region to drawing a box onto the screen:
For example, you can draw a box with:
RED = 200, 0, 0
BOX = Rect((20, 20), (100, 100))

def draw():
    screen.draw.rect(BOX, RED)
Resource Loading
The images and sounds objects can be used to load images and sounds
from files stored in the images and sounds subdirectories respectively.
Pygame Turbo will handle loading of these resources on demand and will cache
them to avoid reloading them.
You generally need to ensure that your images are named with lowercase letters, numbers and underscores only. They also have to start with a letter.
File names like these will work well with the resource loader:
alien.png
alien_hurt.png
alien_run_7.png
These will not work:
3.png
3degrees.png
my-cat.png
sam's dog.png
The resource loader caches loaded images and sounds. To clear the cache (for instance, if you are running into memory issues), use the unload() and unload_all() functions.
Example:
cow = Actor('cow')
loader.images.unload('cow')  # clears the cache of cow.png
loader.images.unload_all()  # clears all cached image files
Images
Pygame Turbo can load images in .png, .gif, and .jpg formats. PNG is
recommended: it will allow high quality images with transparency.
We need to ensure an images directory is set up. If your project contains the following files:
space_game.py
images/alien.png
Then space_game.py could draw the ‘alien’ sprite to the screen with this
code:
def draw():
    screen.clear()
    screen.blit('alien', (10, 10))
The name passed to blit() is the name of the image file within the images
directory, without the file extension.
Or using the Actors API,
alien = Actor('alien')

def draw():
    alien.draw()
There are some restrictions on the file names in both cases: they may only contain lowercase latin letters, numbers and underscores. This is to prevent compatibility problems when your game is played on a different operating system that has different case sensitivity.
Image Surfaces
You can also load images from the images directory using the images
object. This allows you to work with the image data itself, query its
dimensions and so on:
forest = []
for i in range(5):
    forest.append(
        Actor('tree', topleft=(images.tree.get_width() * i, 0))
    )
Each loaded image is a Pygame Surface. You will typically use
screen.blit(...) to draw this to the screen. It also provides handy methods
to query the size of the image in pixels:
- class Surface
- get_width()
Returns the width of the image in pixels.
- get_height()
Returns the height of the image in pixels.
- get_size()
Returns a tuple (width, height) indicating the size in pixels of the surface.
- get_rect()
Get a
Rectthat is pre-populated with the bounds of the image if the image was located at the origin.Effectively this is equivalent to:
Rect((0, 0), image.get_size())
Sounds
Pygame Turbo can load sounds in .wav and .ogg formats. WAV is great for
small sound effects, while OGG is a compressed format that is more suited to
music. You can find free .ogg and .wav files online that can be used in your
game.
We need to ensure a sounds directory is set up. If your project contains the following files:
drum_kit.py
sounds/drum.wav
Then drum_kit.py could play the drum sound whenever the mouse is clicked
with this code:
def on_mouse_down():
    sounds.drum.play()
Each loaded sound is a Pygame Sound, and has various methods to play and
stop the sound as well as query its length in seconds:
- class Sound
- play()
Play the sound.
- play(loops)
Play the sound, but loop it a number of times.
- Parameters:
loops – The number of times to loop. If you pass
-1as the number of times to loop, the sound will loop forever (or until you callSound.stop()
- stop()
Stop playing the sound.
- get_length()
Get the duration of the sound in seconds.
You should avoid using the sounds object to play longer pieces of music.
Because the sounds sytem will fully load the music into memory before playing
it, this can use a lot of memory, as well as introducing a delay while the
music is loaded.
Music
Added in version 1.1.
Warning
The music API is experimental and may be subject to cross-platform portability issues.
In particular:
MP3 may not be available on some Linux distributions.
Some OGG Vorbis files seem to hang Pygame with 100% CPU.
In the case of the latter issue, the problem may be fixed by re-encoding (possibly with a different encoder).
A built-in object called music provides access to play music from within
a music/ directory (alongside your images/ and sounds/ directories,
if you have them). The music system will load the track a little bit at a time
while the music plays, avoiding the problems with using sounds to play
longer tracks.
Another difference to the sounds system is that only one music track can be playing at a time. If you play a different track, the previously playing track will be stopped.
- music.play(name)
Play a music track from the given file. The track will loop indefinitely.
This replaces the currently playing track and cancels any tracks previously queued with
queue().You do not need to include the extension in the track name; for example, to play the file
handel.mp3on a loop:music.play('handel')
- music.play_once(name)
Similar to
play(), but the music will stop after playing through once.
- music.queue(name)
Similar to
play_once(), but instead of stopping the current music, the track will be queued to play after the current track finishes (or after any other previously queued tracks).
- music.stop()
Stop the music.
- music.pause()
Pause the music temporarily. It can be resumed by calling
unpause().
- music.unpause()
Unpause the music.
- music.is_playing()
Returns True if the music is playing (and is not paused), False otherwise.
- music.fadeout(duration)
Fade out and eventually stop the current music playback.
- Parameters:
duration – The duration in seconds over which the sound will be faded out. For example, to fade out over half a second, call
music.fadeout(0.5).
- music.set_volume(volume)
Set the volume of the music system.
This takes a number between 0 (meaning silent) and 1 (meaning full volume).
- music.get_volume()
Get the current volume of the music system.
If you have started a music track playing using music.play_once(), you
can use the on_music_end() hook to do something when the
music ends - for example, to pick another track at random.
Mouse
The built-in mouse object can be used to get information of various current states of the mouse in the game: where it is, what buttons are pressed, whether it is visible and many more…
It can also be used to manipulate the mouse, for example changing its position or the displayed mouse cursor.
- class Mouse
- pressed
Returns a tuple of three booleans for the left, middle and right mouse buttons in order. True means the button is currently pressed.
- pressed_left
Returns True if the left mouse button is currently pressed, False else.
- pressed_middle
Returns True if the middle mouse button is currently pressed, False else.
- pressed_right
Returns True if the right mouse button is currently pressed, False else.
- pos
Returns the current position of the mouse.
Setting this will teleport the mouse to the supplied position inside the game window.
- last_called_pos
Returns the position of the mouse at the time this value was last read.
- recent_pos
Returns a tuple of the n last positions the mouse had moved to starting from the most recent. Default for n is 60 and can be changed via recent_pos_max.
- recent_pos_max
Returns the total number of positions tracked via recent_pos.
Increasing this value simply extends the length of the queue of tracked positions. Decreasing it also cuts the queue to the new maximum number of elements.
- rel
Returns the relative position change of the mouse over the last frame.
- last_called_rel
Returns the relative position change of the mouse since this value was last read.
- recent_rel
Returns a tuple of the n last position changes the mouse had, starting from the most recent. Default for n is 60 and can be changed via recent_rel_max.
- recent_rel_max
Returns the total number of position changed tracked via recent_pos.
Increasing this value simply extends the length of the queue of tracked positions. Decreasing it also cuts the queue to the new maximum number of elements.
- visible
Returns a boolean of whether the mouse cursor is currently visible.
Setting this to either a boolean or 0 or 1 makes the mouse visible or invisible.
- focused
Returns a boolean of whether the game window is currently focused.
- cursor
Returns a tuple with two elements: the name string of the current cursor and the hotspot of the cursor if it is known.
Setting this loads a new cursor and applies it to the mouse. This can be done with either one string, or one string and a hotspot position tuple at the same time.
For a more detailed explanation, see below.
- cursor_name
Returns the current name string of the mouse cursor.
- cursor_hotspot
Returns the hotspot tuple of the current cursor or None if the hotspot is unknown (because it is a system cursor).
Recent pos and rel
The mouse.recent_pos and mouse.recent_rel attributes allow
you to get the last recorded positions and relative movements from
any mouse movement event. This can be used among other things to
make visual effects of things “following” the mouse. Here is an
example that draws a trail of circles behind the mouse:
def draw():
    for p in mouse.recent_pos:
        screen.draw.circle(p, 5, "red")
How many events back are recorded is controlled by recent_pos_max
and recent_rel_max. It’s important to note here that these
attributes don’t record the position and relative movement for each
frame, like mouse.rel for example does, but rather the positions
and changes for each individual mouse movement event. Since multiple
mouse movement events can happen in a single frame, there is no fixed
relationship between the number of frames passed and the recorded
positions and relative changes. In general though, a higher maximum
value means positions and changes from longer before will still be
recorded.
Cursors
Many games change how the mouse cursor looks. PGTurbo lets you control
this by setting the mouse.cursor attribute. There are two options
here: system cursors or custom cursors.
Windows, MacOS and Linux systems all come with a variety of pre-made
cursor shapes ready to use. To change to any of them, simply use
mouse.cursor = "ARROW" where “ARROW” is usually the default cursor
on your system. To use something else, simply change the string to one
of these options: “ARROW”, “IBEAM”, “WAIT”, “CROSSHAIR”, “HAND”.
If you want to use a custom cursor from an image you have in the
images folder, just call mouse.cursor = "image_name" and the
cursor will automatically be loaded from the image resource.
When using a custom cursor, you might also want to tell PGTurbo where in the image the spot is, where an actual mouse click should occur. The default cursor of most systems has this in the top left corner of the cursor image but yours could have it in the center (think shooter crosshairs), in the top middle (a pointing hand maybe) or anywhere else.
To tell PGTurbo where to put the actual point, you can also give a hotspot
tuple when setting the cursor: mouse.cursor = "image_name", (12, 0).
This tells the game that when you press a mouse button, the click should
happen not at the top left corner of the cursor image, but 12 pixels to
the right of it. This might be the top middle for a cursor with an image
size of 24x24 pixels. The center for a 40x40 pixels cursor would be
(20, 20).
This tuple is simply a position tuple like the kind we already know about. The only difference is that it looks for the position to put mouse clicks not in relation to the top left corner of the game window, but just the cursor image.
System cursors define their own hotspot, so you don’t have to worry about
them. This also means you can’t manually check the hotspot of system
cursors with mouse.cursor_hotspot however. This will return None
when a system cursor is in use.
LEFT or pressed_left
While both are accessed via mouse, mouse.LEFT and
mouse.pressed_left are different things. mouse.LEFT is used
in your custom functions that handle mouse events, e.g.
if button == mouse.LEFT whereas mouse.pressed and its variants
can be used outside of these, for example in the update() function to
check whether a mouse button is pressed at that moment.
Example:
def on_mouse_down(button):
    if button == mouse.LEFT:
        play_tune()

def update():
    if mouse.pressed_right:
        fireworks()
mouse.WHEELUP and mouse.WHEELDOWN have no equivalent outside of
on_mouse functions since these can’t be held down.
Controllers
PGTurbo supports one or multiple game controllers for use as input devices.
There are two builtin objects to use: joy and joysticks.
joy
joy is the easy and accessible way to check for the state of connected
controllers. If you want to support just one controller as an input method
just like a keyboard or a mouse, then you can think of joy the same way
you do of keyboard to check if a key is pressed down or not:
def update():
    if joy.face_down:
        move_speed = 15
    else:
        move_speed = 10

    player.x = player.x + joy.left_x * move_speed
    player.y = player.y + joy.left_y * move_speed
In the same way, you can also use the current state of a controller axis like a thumbstick. In the example, we change the movement speed of the player if the the lower face button is held down. Then, we change the players position based on the left stick deflection. Since the axis returns values from -1 to 1 we have to multiply this by however fast we want the Actor to move at most.
It’s that easy to get smooth controller movement with varying speeds based on
how far a stick is pushed. joy has the following attributes that you can
use:
- class Joystick
- face_up
Returns
Trueif the upper face button is currently held down.face_down,face_leftandface_rightare also available.
- dpad_up
Returns
Trueif the DPAD is held up.dpad_down,dpad_leftanddpad_rightare also available.
- shoulder_left
Returns
Trueif the left shoulder button is pressed down.shoulder_rightis also available.
- push_left
Returns
Trueif the left thumbstick is pressed in.push_rightis also available.
- center_left
Returns
Trueif the left most button on the controller front is pressed.center_middleandcenter_rightare also available.Note: Left, middle and right buttons usually correspond to the physical locations on the controller, but there may be some devices where this is not true.
- left_x
Returns the value of the X axis of the left thumbstick (horizontal movement). Values range from -1 to 1 with -1 being fully pressed left, 0 being centered and 1 being fully pressed right.
right_xis also available.
- left_y
Returns the value of the Y axis of the left thumbstick (vertical movement). Values range from -1 to 1 with -1 being fully pressed up, 0 being centered and 1 being fully pressed down.
right_xis also available.
- left_stick
Returns the values of both axes of the left thumbstick as a tuple of two floats between -1 and 1.
right_stickist also available.
- left_angle
Returns the angle to which the left thumbstick is currently held with 0 degrees indicating straight right (see Rotation of Actors).
right_angleis also available.If the stick is centered,
Noneis returned.
- left_trigger
Returns the value of the left trigger axis as a float between 0 and 1 with 0 being unpressed and 1 being fully pressed in.
right_triggeris also available.
- name
Returns the human readable name of the controller as a string.
- guid
Returns the unique hardware identifier of the controller as a string.
joy is a special controller object that is always available and always safe
to access. Even if no actual controller is connected, joy will always be
available and simply report all buttons unpressed and all axes in neutral
position. This is because joy is a virtual controller that is affected
by any controller input.
That means that when face_up is pressed on any connected controller,
face_up will be pressed on joy. If at the same time the left stick is
moved on a different controller, joy will mirror that movement.
It’s done this way to make coding a game with support for a single controller
as easy as possible. If you want a single person to control your game with a
controller, you don’t need to think about anything else, you can use joy
and it will just work. The only downside is that name, guid and
instance_id of joy will not report the values for the actual controller
used but instead generic stand-ins.
If you want support for multiple controllers, then you use the joysticks
object.
joysticks
The joysticks object acts as a manager for the connected joystick devices.
It works like a dictionary that you can only read from, not change manually,
that also has some additional functions. Each entry has the instance_id
of the controller as its key with the value being the actual Joystick object.
It automatically tracks connected devices and their inputs, so the only thing
you need to think about it accessing the right controller. This works the
following way:
if len(joysticks) >= 2:
    cons = joysticks.keys()
    player_1_con = joysticks[cons[0]]
    player_2_con = joysticks[cons[1]]
Because joysticks works like a dictionary, you can get the number of
connected devices with len(joysticks). joysticks.keys() gives you
all IDs of the connected controllers. Since the IDs are the key for the
joysticks dictionary, you can get any Joystick object with
joysticks[instance_id]. In this case, we assign the first two connected
devices to player 1 and player 2 as their controllers. We save them in
variables to have easier access to them later and if a device is disconnected,
we can assign a different controller to that player.
Using specific joysticks works exactly the same as using joy. Here’s an
example of how to differentiate controls between joysticks:
def update():
    if player_1_con:
        p1_actor.x = p1_actor.x + player_1_con.left_x * move_speed
        p1_actor.y = p1_actor.y + player_1_con.left_y * move_speed

    if player_2_con:
        p2_actor.x = p2_actor.x + player_2_con.left_x * move_speed
        p2_actor.y = p2_actor.y + player_2_con.left_y * move_speed
Since we aren’t working with joy anymore but with specific devices,
we always have to make sure to account for the possibility of them being
disconnected. If that happens, whatever access method we used before
(directly via joysticks or with a variable) will return None
instead. This way, simply checking if con_object: let’s us only run
code if a valid device can be reached.
If a device is disconnected, an event is triggered that can be reacted
to by defining an on_joy_removed() function. Here, we could assign
player_1_con to a different joystick object, if the previous one is
disconnected. More information on this can be found in the section on
joystick event hooks.
It’s common to assign controllers based on which one was last used. To
make this possible, joysticks.last_used returns the Joystick object
that last recorded an input. If you want your players to be able to pick
their controllers, simply tell them to make any input and then assign them
joysticks.last_used one after the other.
Important: Since joysticks automatically updates the connected
controllers, we can’t change the contents of the “dictionary” it represents.
Trying to do something like joysticks[5] = ... will result in an error.
Clock
Often when writing a game, you will want to schedule some game event to occur at a later time. For example, we may want a big boss alien to appear after 60 seconds. Or perhaps a power-up will appear every 20 seconds.
More subtle are the situations when you want to delay some action for a shorter period. For example you might have a laser weapon that takes 1 second to charge up.
We can use the clock object to schedule a function to happen in the
future.
Let’s start by defining a function fire_laser that we want to run in the
future:
def fire_laser():
    lasers.append(player.pos)
Then when the fire button is pressed, we will ask the clock to call it for
us after exactly 1 second:
def on_mouse_down():
    clock.schedule(fire_laser, 1.0)
Note that fire_laser is the function itself; without parentheses, it is
not being called here! The clock will call it for us.
(It is a good habit to write out times in seconds with a decimal point, like
1.0. This makes it more obvious when you are reading it back, that you are
referring to a time value and not a count of things.)
Scheduling with arguments
Added in version 1.7.
The fire_laser function above doesn’t need to be called with any arguments,
but what if you want to schedule a function that does take arguments?
Let’s image a game about mining where differently colored gems pop up from time to time. It would be easiest to have just one function that creates a new gem that can do so with different colors and positions:
def create_gem(color, posx, posy):
    new_gem = Actor("gem_" + color, (posx, posy))
    gems.append(new_gem)
When you schedule function calls that need arguments, you need to give these after the callable and delay in the clock call:
clock.schedule(create_gem, 4.5, "red", 240, 120)
Any values you give schedule, schedule_unique or schedule_interval
after the delay will simply be passed on to the function call as arguments when
it happens.
Note that if you schedule a function with arguments, you also need to
unschedule() it with the same arguments to stop it from being called. If
you want to remove all calls to a certain function regardless of arguments,
simply use clock.unschedule_all(callable).
Elapsed time and marks
Added in version 1.4.
Another use of clock is to keep track of elapsed time in different ways. If you
just want to get the total time since the program started, clock.time
will return how many seconds have passed. Often though, we are more interested
in how much time has gone by since a certain starting moment like the start of
a round for example:
def update():
    if keyboard.space and round_over:
        clock.mark_time("game_begin")
        # ...
    # ...
    if opponent.colliderect(player) and not round_over:
        time_played = clock.time_since_mark("game_begin")
        # ...
In the example, a round is started when the space key is pressed. Besides
everything else that needs to happen to start the game, we remember when the
game was started with clock.mark_time(). We called the mark “game_begin” so
that’s what we need to use later again.
When the round ends (when the opponent touches the player) we can then get the
length of the round by calling clock.time_since_mark() with the name of the
mark we set up before.
Since times are returned in seconds, they are often long fractions of whole
numbers. If you want to display time values in the game window, consider
converting the timestamp to a whole number with int(timestamp) first.
int() from a float will always round down, which is usually desirable
for displaying elapsed seconds.
Timescale
Added in version 1.6.
To change how fast time is running in your game, you can set
clock.timescale. 2.0 would make all clock related things
happen twice as fast, where 0 would effectively pause the clock. If you
scheduled a function call to happen in two seconds and then did
clock.timescale = 0.5 right afterwards, the function would only be
called four seconds later in real time. If you want your whole game to respect
this timescale you need to make sure anything involving movement or counting
over time is affected by the timescale:
def update(dt):
    if keyboard.w:
        alien.y -= 10 * dt * clock.timescale
Now when you change the timescale, it will look to the player like the whole game has slowed down, sped up or been paused.
This also affects the reported elapsed times by clock.time
and time marks. This is usually good, but if you want to get the total time
elapsed since program start without respecting changes to timescale, you can
get it with clock.absolute_time.
clock provides the following useful methods:
- class Clock
- property time
Returns the elapsed time while respecting timescale changes.
Cannot be set by the user.
- property absolute_time
Returns the elapsed time without respecting timescale changes.
This always returns the actual second count since program start.
Cannot be set by the user.
- property timescale
Controls the speed at which time is counted for
timeproperty and scheduling of function calls.1.0is normal game time, values above will increase the speed while values above zero slow the timing down.0.0will pause the time counting.
- schedule(callback, delay, *args, **kwargs)
Schedule callback to be called after the given delay.
Repeated calls will schedule the callback repeatedly.
- Parameters:
callback – A callable (usually a function you wrote).
delay – The delay, in seconds, before the function should be called.
args – Any further arguments will be given to callback as positional arguments when called.
kwargs – Any further named arguments will be given to callback as keyword arguments when called.
- schedule_unique(callback, delay, *args, **kwargs)
Schedule callback to be called once after the given delay.
If callback was already scheduled, cancel and reschedule it. This applies also if it was scheduled multiple times: after calling
schedule_unique, it will be scheduled exactly once.- Parameters:
callback – A callable (usually a function you wrote).
delay – The delay, in seconds, before the function should be called.
args – Any further arguments will be given to callback as positional arguments when called.
kwargs – Any further named arguments will be given to callback as keyword arguments when called.
- schedule_interval(callback, interval, *args, **kwargs)
Schedule callback to be called repeatedly.
- Parameters:
callback – A callable (usually a function you wrote).
interval – The interval in seconds between calls to callback.
args – Any further arguments will be given to callback as positional arguments when called.
kwargs – Any further named arguments will be given to callback as keyword arguments when called.
- unschedule(callback, *args, **kwargs)
Unschedule only the callback with the given arguments if it has been previously scheduled (either because it had been scheduled with
schedule()and has not yet been called, or because it had been scheduled to repeat withschedule_interval().This means that if you scheduled
set_gem_colorwith"red"and"blue"for separate delays before and then callclock.unschedule(set_gem_color, "red")only the call with"red"as an argument will be unscheduled.- Parameters:
callback – A callable (usually a function you wrote).
args – Any further arguments will be given to callback as positional arguments when called.
kwargs – Any further named arguments will be given to callback as keyword arguments when called.
- unschedule_all(callback)
Unschedule all calls of the given callback, ignoring any arguments supplied to them.
This means that if you scheduled
set_gem_colorwith"red"and"blue"for separate delays before, both will be unscheduled.- Parameters:
callback – A callable (usually a function you wrote).
Note that the Pygame Turbo clock only holds weak references to each callback you give it. It will not fire scheduled events if the objects and methods are not referenced elsewhere. This can help prevent the clock keeping objects alive and continuing to fire unexpectedly after they are otherwise dead.
The downside to the weak references is that you won’t be able to schedule lambdas or any other object that has been created purely to be scheduled. You will have to keep a reference to the object.
- mark_time(name)
Creates a record of the current elapsed time and saves it with the given name. Use this to save when something happened in the game. Calling the function again overwrites the previous timestamp with the new one.
- Parameters:
name – A string name for the time mark.
- get_mark_time(name)
Returns the timestamp that was saved under name. If the mark does not exist (yet), returns
Noneinstead.
- Parameters:
name – A string name for the time mark.
- time_since_mark(name)
Returns the time elapsed since the mark name was created. If the mark does not exist (yet), returns
Noneinstead.
- Parameters:
name – A string name for the time mark.
- get_all_marks()
Returns a dictionary of all currently saved marks and their timestamps. Note that changing this dictionary does not affect the underlying data in clock.
Actors
Once you have many images moving around in a game it can be convenient to have
something that holds in one place the image and where it is on screen. We’ll
call each moving image on screen an Actor. You can create an actor by supplying
at least an image name (from the images folder above). To draw the alien talked
about above:
alien = Actor('alien', (50, 50))

def draw():
    screen.clear()
    alien.draw()
You can move the actor around by setting its pos attribute in an update:
def update():
    if keyboard.left:
        alien.x -= 1
    elif keyboard.right:
        alien.x += 1
And you may change the image used to draw the actor by setting its image attribute to some new image name:
alien.image = 'alien_hurt'
Actors have all the same attributes and methods as Rect, including methods like .colliderect() which can be used to test whether two actors have collided. This is quick but imperfect collision detection.
Additionally, collisions between actors can be checked more precisely by
calling actor1.collidemask(actor2). This checks collision down to the
pixel level, meaning that if the rects of two actors overlap but their
images don’t actually intersect, a collision won’t be reported. This is
a lot more precise but also more work to check for. If coarse detection
is fine, always use .colliderect(). If you need high precision, use
.collidemask() only where it is necessary.
Positioning Actors
If you assign a new value to one of the position attributes then the actor will be moved. For example:
alien.right = WIDTH
will position the alien so its right-hand side is set to WIDTH.
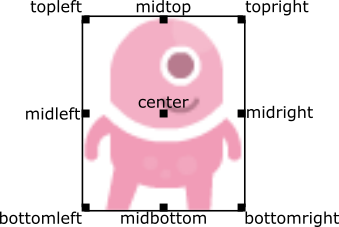
Similarly, you can also set the initial position of the actor in the
constructor, by passing one of these as a keyword argument: pos,
topleft, topright, bottomleft, bottomright, midtop,
midleft, midright, midbottom or center:
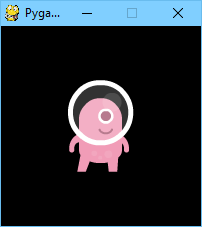
This can be done during creation or by assigning a pair of x, y co-ordinates. For example:
WIDTH = 200
HEIGHT = 200

alien = Actor('alien', center=(100,100))

def draw():
    screen.clear()
    alien.draw()
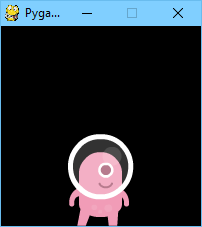
Changing center=(100, 100) to midbottom=(100, 200) gives you:
If you don’t specify an initial position, the actor will initially be
positioned in the top-left corner (equivalent to topleft=(0, 0)).
Anchor point
Actors have an “anchor position”, which is a convenient way to position the
actor in the scene. By default, the anchor position is the center, so the
.pos attribute refers to the center of the actor (and so do the x and
y coordinates). It’s common to want to set the anchor point to another
part of the sprite (perhaps the feet - so that you can easily set the Actor to
be “standing on” something):
alien = Actor('alien', anchor=('center', 'bottom'))
spaceship = Actor('spaceship', anchor=(10, 50))
anchor is specified as a tuple (xanchor, yanchor), where the values can
be floats or the strings left, center/middle, right, top or
bottom as appropriate.
Scale
Added in version 1.5.
You can change the size of actors by setting the right properties:
alien = Actor("alien", (150, 150))

def update():
    if keyboard.space:
        alien.scale = 2
    else:
        alien.scale = 1
In the example, the “alien” actor will be twice as big whenever you hold the
spacebar down on the keyboard. scale can be set to a single value like
2 or 0.5 to change width and height to the same degree. Alternatively
you can give scale a tuple like (0.5, 2) to make the actor half as wide
and twice as tall. If you just want to control the size in one dimension, you
can also just set actor.scale_x and actor.scale_y directly:
def update():
    if keyboard.x:
        alien.scale_x = 2
    else:
        alien.scale_x = 1

    if keyboard.y:
        alien.scale_y = 2
    else:
        alien.scale_y = 1
When changing the dimension of actors, their image will grow or shrink around
their anchor point and position. So if the anchor point is
("center", "bottom") and you scale an actor up, it will “grow” upwards. If
the anchor point is centered the actor will grow in all directions
proportionally.
Width and height
Added in version 1.5.
Another way to control the size of an actor is to set its width and
height properties, which also automatically updates the scale properties
so that both pixel dimensions and relative size are synchronized properly.
As an example, let us stretch an actor while holding down a key:
def update():
    if keyboard.space:
        alien.width += 2
These properties always return and set the dimensions of the actor image at its current size. When an actor is rotated however, the width and height it occupies in total is bigger than just the image. If you want to know how much distance an actor covers in total in the X- or Y-axis while rotated, use these properties instead:
alien.angle = 60
total_height = alien.bounding_height
total_width = alien.bounding_width
While an actor is not rotated, these are both the same as the normal width
and height properties.
Flipping
Added in version 1.5.
Besides scaling actors up and down, we can also flip the actor image along the
X- and/or Y-axis. Simply set the flip_x and flip_y properties to
True to do so or False to set the image to the normal orientation:
alien = Actor("alien", (150, 200))
alien.flip_y = True
If you just want to change whatever the current value is to the other one
(either going from not flipped to flipped or the other way around) you can use
the following code: player.flip_x = not player.flip_x. The not keyword
combined with getting the current value means you will always make the flipped
state switch to whatever it is not currently on.
Flipping via the properties doesn’t move an actor image at all. If for example
you have an actor with their anchor centered on the bottom and you want to
flip it so that the actor ends up “hanging” upside down in comparison to its
previous position, you can use flip_y_over_anchor(). This function and
flip_x_over_anchor() both flip the whole actor with the image, anchor point
and position so the result is the actor being mirrored across the anchor.
- Actor.flip_x_over_anchor()
Mirrors the actor across the anchor point in the X axis by flipping the image and updating anchor and position of the actor.
- Actor.flip_y_over_anchor()
Mirrors the actor across the anchor point in the Y axis by flipping the image and updating anchor and position of the actor.
Note: These methods of flipping change the anchor position of the actor. A
value of ("center", "bottom") will become ("center", "top") after using
flip_y_over_anchor().
Rotation
Added in version 1.2.
The .angle attribute of an Actor controls the rotation of the sprite, in
degrees, anticlockwise (counterclockwise).
The centre of rotation is the Actor’s anchor point.
Note that this will change the bounding_width and bounding_height of
the Actor. These properties report the width and height of the bounding box
containing the actor and cannot be set manually.
For example, to make an asteroid sprite spinning slowly anticlockwise in space:
asteroid = Actor('asteroid', center=(300, 300))

def update():
    asteroid.angle += 1
To have it spin clockwise, we’d change update() to:
def update():
    asteroid.angle -= 1
As a different example, we could make an actor ship always face the mouse
pointer. Because angle_to() returns 0 for “right”, the sprite we
use for “ship” should face right:
ship = Actor('ship')

def on_mouse_move(pos):
    ship.angle = ship.angle_to(pos)

Remember that angles loop round, so 0 degrees == 360 degrees == 720 degrees. Likewise -180 degrees == 180 degrees.
Distance and angle to
Added in version 1.2.
Actors have convenient methods for calculating their distance or angle to other
Actors or (x, y) coordinate pairs.
- Actor.distance_to(target)
Return the distance from this actor’s position to target, in pixels.
- Actor.angle_to(target)
Return the angle from this actor’s position to target, in degrees.
This will return a number between -180 and 180 degrees. Right is 0 degrees and the angles increase going anticlockwise.
Therefore:
Left is 180 degrees.
Up is 90 degrees.
Down is -90 degrees.
Angle Movement
If an actor is rotated and should move based on its rotation, doing so by adjusting X and Y coordinates manually can be complicated. To make moving actors around their rotation easier, Pygame Turbo provides built-in functions.
- Actor.move_towards_angle(angle, distance)
Moves the actor the given distance along the given angle.
- Actor.move_towards_point(point, distance[, overshoot])
Moves the actor the given distance towards the given point of X and Y.
By default, if the distance to the point is smaller than the given distance, the actor will only move up to the point but not overshoot it. If the optional parameter
overshootis given as True however, the actor will move past the target point if the given distance is far enough.
- Actor.move_forward(distance)
Moves the actor forwards along its current angle by the given distance.
- Actor.move_backward(distance)
Moves the actor backwards in the opposite direction of its current angle by the given distance.
- Actor.move_left(distance)
Moves the actor sideways to the left when viewing its angle as forward.
This does not mean the actor moves along the Y-axis, but instead that if the actor is pointing to the right, then right is forward to the actor and left from its perspective would be up in the game window.
- Actor.move_right(distance)
Moves the actor sideways to the right when viewing its angle as forward.
The same applies here. Right is always in relation to where the actor is pointing.
These function could be used to have actors always move towards the player, circle around a point in a level, get pushed away from something or many other options. As a small example, let’s have the spaceship follow the mouse around the game window:
ship = Actor('ship')
mouse_position = (0, 0)

def on_mouse_move(pos):
    # To change mouse_position from within a function,
    # we have to declare it global here.
    global mouse_position
    mouse_position = pos

def update():
    # To just read the value of the global variable,
    # we don't have to do anything else.
    ship.move_towards_point(mouse_position, 5)
Note: When using move_towards_point() with overshoot=True, if the
function is called every frame (for example in update()), the actor will
rapidly jump back and forth since the angle to the target point gets inverted
every frame. To prevent this, use move_towards_point() without overshoot
or make sure it is not called rapidly with overshoot.
Velocity and interception
In many games, there are lots of things only ever moving along straight lines. This means they always move with a constant velocity in the X and Y axes, for which Actors have properties:
.vxand.vyrepresent the velocity in either axis direction..velrepresents the velocity in both axes as a tuple.
Just like .x, .y and .pos, these can be read or set individually
or together.
Once an Actor has a velocity, moving them along it is easy.
- Actor.move_by_vel([scale])
Moves the Actors position by its velocity once. Calling this every
update()will smoothly move the actor along its velocity trajectory.If the Actor should be moved at the same angle but different speed, the function can be given an optional parameter.
2.0would move twice as fast, whereas0.1would move at 10% of the speed.
Almost as often, we might also want to have an object lead its trajectory to intercept some other game object which is also moving. There is also a dedicated function for this.
- Actor.intercept_velocity(target, speed)
Returns a velocity tuple that will move from the position of the Actor to intercept the target Actor with the given speed, as long as the target does not change its velocity at some point.
The target Actor must have its velocity set for this to work. If no valid interception is possible (because the speed is too low),
Noneis returned.
To move an Actor to intercept a target, we can simply set its velocity to the calculated interception velocity.:
catcher = Actor("catcher", (40, 20))
catcher.vel = (3, -1)
ball = Actor("ball", (10, 10))
ball.vel = ball.intercept_velocity(catcher, 12.0)

def update():
    catcher.move_by_vel()
    ball.move_by_vel()

def draw()
    screen.clear()
    catcher.draw()
    ball.draw()
Transparency
Added in version 1.3.
In some cases it is useful to make an Actor object partially transparent. This can be used to fade it in or out, or to indicate that it is “disabled”.
The .opacity attribute of an Actor controls how transparent or opaque it
is.
When an actor is not at all transparent, we say it is “opaque” and it has
opacityof1.0, and you can’t see through it at all.When an actor is completely transparent, it has an
opacityof0.0. This will make it completely invisible.
To make an actor that is half-transparent (like a ghost), you could write:
ghost = Actor('ghost')
ghost.opacity = 0.5
This diagram shows the scale; the grey checkerboard is used to give the sense of transparency:

Tip
The order in which you draw overlapping transparent objects still matters. A ghost seen through a window looks slightly different to a window seen through a ghost.
Simple shapes
If you don’t have images yet, not to worry! You can start by creating actors
from simple colored shapes like a rectangle or a circle. Instead of calling
Actor("image_name") you instead call
Actor.Shape(width, height, color).
Here’s an example:
character = Actor.Rectangle(100, 100, "red")
shot = Actor.Ellipse(60, 20, "blue")
sword = Actor.Triangle(50, 15, "green")
The following shapes can be created this way:
- Actor.Rectangle(width, height, color)
Creates an actor with a filled rectangle of the given color as its image. To create a perfect square, simply give the same value for both width and height.
- Actor.Ellipse(width, height, color)
Creates an actor with a filled circular shape of the given color as its image. The background of the image is transparent. To create a perfect circle, simply give the same value for both width and height.
- Actor.Triangle(width, height, color)
Creates an actor with a filled triangle of the given color as its image. The triangle points to the right so it always points in the direction of the
angleof the actor.
If you wanted to define other parameters like anchor or position when creating the actors, you can still do so just like with a normal Actor construction:
balloon = Actor.Ellipse(50, 50, "red", (150, 150), anchor=("center", "bottom"))
On screen or not
There is a simple function to check whether an Actor is visible on the screen:
- Actor.is_onscreen()
Returns
Trueif the Actor is currently inside the screen bounds andFalseif not.
This can be useful if you have many game objects flying around the screen that should disappear as soon as they are out of sight.
The Keyboard
You probably noticed that we used the keyboard in the above code.
If you’d like to know what keys are pressed on the keyboard, you can query the
attributes of the keyboard builtin. If, say, the left arrow is held down,
then keyboard.left will be True, otherwise it will be False.
There are attributes for every key; some examples:
keyboard.a  # The 'A' key
keyboard.left  # The left arrow key
keyboard.rshift  # The right shift key
keyboard.kp0  # The '0' key on the keypad
keyboard.k_0  # The main '0' key
The full set of key constants is given in the Buttons and Keys documentation, but the attributes are lowercase, because these are variables not constants.
Deprecated since version 1.1: Uppercase and prefixed attribute names (eg. keyboard.LEFT or
keyboard.K_a) are now deprecated; use lowercase attribute names
instead.
Added in version 1.1: You can now also query the state of the keys using the keyboard constants themselves:
keyboard[keys.A]  # True if the 'A' key is pressed
keyboard[keys.SPACE]  # True if the space bar is pressed
Animations
You can animate most things in pygame using the builtin animate(). For
example, to move an Actor from its current position on the
screen to the position (100, 100):
animate(alien, pos=(100, 100))
- animate(object, tween='linear', duration=1, on_finished=None, **targets)
Animate the attributes on object from their current value to that specified in the targets keywords.
- Parameters:
tween – The type of tweening to use.
duration – The duration of the animation, in seconds.
on_finished – Function called when the animation finishes.
targets – The target values for the attributes to animate.
The tween argument can be one of the following:
‘linear’ |
Animate at a constant speed from start to finish |
|
‘accelerate’ |
Start slower and accelerate to finish |
|
‘decelerate’ |
Start fast and decelerate to finish |
|
‘accel_decel’ |
Accelerate to mid point and decelerate to finish |
|
‘in_elastic’ |
Give a little wobble at the end |
|
‘out_elastic’ |
Have a little wobble at the start |
|
‘in_out_elastic’ |
Have a wobble at both ends |
|
‘bounce_end’ |
Accelerate to the finish and bounce there |
|
‘bounce_start’ |
Bounce at the start |
|
‘bounce_start_end’ |
Bounce at both ends |
|
The animate() function returns an Animation instance:
- class Animation
- stop(complete=False)
Stop the animation, optionally completing the transition to the final property values.
- Parameters:
complete – Set the animated attribute to the target value.
- running
This will be True if the animation is running. It will be False when the duration has run or the
stop()method was called before then.
- on_finished
You may set this attribute to a function which will be called when the animation duration runs out. The
on_finishedargument toanimate()also sets this attribute. It is not called whenstop()is called. This function takes no arguments.
Tone Generator
Added in version 1.2.
Pygame Turbo can play tones using a built-in synthesizer.
- tone.play(pitch, duration)
Play a note at the given pitch for the given duration.
Duration is in seconds.
The pitch can be specified as a number in which case it is the frequency of the note in hertz.
Alternatively, the pitch can be specified as a string representing a note name and octave. For example:
'E4'would be E in octave 4.'A#5'would be A-sharp in octave 5.'Bb3'would be B-flat in octave 3.
Creating notes, particularly long notes, takes time - up to several milliseconds. You can create your notes ahead of time so that this doesn’t slow your game down while it is running:
- tone.create(pitch, duration)
Create and return a Sound object.
The arguments are as for play(), above.
This could be used in a Pygame Turbo program like this:
beep = tone.create('A3', 0.5)

def on_mouse_down():
    beep.play()
Data Storage
The storage object behaves just like a Python dictionary but its contents
are preserved across game sessions. The values you assign to storage will be
saved as JSON, which means you can only store certain types of objects in it:
list/tuple, dict, str, float/int, bool, and
None.
The storage for a game is initially empty. Your code will need to handle
the case that values are loaded as well as the case that no values are found.
A tip is to use setdefault(), which inserts a default if there is no value
for the key, but does nothing if there is.
For example, we could write:
storage.setdefault('highscore', 0)
After this line is executed, storage['highscore'] will contain a value -
0 if there was no value loaded, or the loaded value otherwise. You could
add all of your setdefault lines towards the top of your game, before
anything else looks at storage:
storage.setdefault('level', 1)
storage.setdefault('player_name', 'Anonymous')
storage.setdefault('inventory', [])
Now, during gameplay we can update some values:
if player.colliderect(mushroom):
    score += 5
    if score > storage['highscore']:
        storage['highscore'] = score
You can read them back at any time:
def draw():
    ...
    screen.draw.text('Highscore: ' + storage['highscore'], ...)
…and of course, they’ll be preserved when the game next launches.
These are some of the most useful methods of storage:
- class Storage(dict)
- storage[key] = value
Set a value in the storage.
- storage[key]()
Get a value from the storage. Raise KeyError if there is no such key in the storage.
- setdefault(key, default)
Insert a default value into the storage, only if no value already exists for this key.
- get(key, default=None)
Get a value from the storage. If there is no such key, return default, or None if no default was given.
- clear()
Remove all stored values. Use this if you get into a bad state.
- save()
Saves the data to disk now. You don’t usually need to call this, unless you’re planning on using
load()to reload a checkpoint, for example.
- load()
Reload the contents of the storage with data from the save file. This will replace any existing data in the storage.
- path
The actual path to which the save data will be written.
Caution
As you make changes to your game, storage could contain values that
don’t work with your current code. You can either check for this, or call
.clear() to remove all old values, or delete the save game file.
Tip
Remember to check that your game still works if the storage is empty!